• Skip to main content
  • Skip to primary sidebar
  • Home
  • Table of Contents
  • About
  • Privacy Policy

My Blog

Just a man in the arena

You are here: Home / Archives for Canada

Canada

How to Get Your Canadian Citizenship

May 18, 2012 By Antonio Cangiano 84 Comments

Yesterday I took, and passed, the Canadian citizenship test. Much like obtaining the G1 license in Ontario, I didn’t find enough information online about the process, so I thought I would share some details regarding my personal experience here.

Flag of Canada

The process to obtain your Canadian citizenship

Before delving into the details of preparing and passing the citizenship test, I want to provide you with a quick overview of the entire process:

  1. First you’ll need to determine if you are eligible to apply and then, if you are, apply for Canadian citizenship. You’ll need to be a permanent resident who’s been in the country long enough in order to do so.
  2. Wait a long time. The current processing time is, on average, about 19 months. After several months, the status of your application will change to reflect the fact that your application has been received and is now being processed. Thankfully you can check the status of your citizenship application online. At some point you might receive a notice in the mail stating that your application has been accepted. This notice doesn’t mean that you’ll become a Canadian citizen for sure; just that the CIC has verified that your application was prepared correctly and will now be further processed.
  3. Some time later, you’ll receive a notice to appear at a local citizenship and immigration center. This notice will tell you exactly what documents you need to bring, as well as the date and time of your meeting.
  4. Once you pass your knowledge and linguistic ability test, you’ll be invited to a citizenship ceremony, which will is typically attended by yourself and your family and friends. Here you’ll receive a citizenship certificate, which (it’s worth noting) cannot be used for identification purposes (as the government wants you to apply for a passport instead).

Since most people already have citizenship from a different country (in my case, Italy), it’s important to note that Canada is happy to give you citizenship even if you plan to keep your original citizenship. Dual citizenship is allowed in Canada.

Other countries however may not allow you to keep your original citizenship or may require you to go through a process to let them know about your new citizenship. Either way, this has nothing to do with Canada, and you should contact your country of origin’s consulate in Canada for questions related to dual citizenship.

Back to the topic of the citizenship test itself, in this post I focus on the third step in the process outlined above, which is the least documented one. The fourth step is really straightforward. It’s just a formal ceremony where you’ll recite the oath of citizenship, sign and receive your citizenship certificate.

On the day of your citizenship test

You may wondering what things are going to be like on the day of your citizenship test. The notice you receive in the mail prior to this day will include details of where and when you need to appear. If you foresee not being able to attend on your scheduled test date, contact the CIC (by telephone) immediately to let them know and to reschedule your test.

It’s important that you arrive on time. In my case I arrived half an hour beforehand, and I suggest you do the same to be on the safe side. Nevertheless, in my case arriving early turned out to be a moot point because the appointment was at 1pm, and the office was closed between 12pm and 1pm for lunch. (At my local Kelowna center the opening hours were 10am-12pm, and 1pm-3pm, but I’m not 100% sure that your local center will have the same hours.)

You’ll be asked to provide your notice to the clerk at the window, and then to have seat. After a while you’ll be called in for registration. This is an informal interview that should not last more than 10-15 minutes. During this interview you’ll be asked to provide the original documents of the photocopies you sent in with your citizenship application, as well as a photocopy of your passport’s biographical information (basically the first two pages).

They won’t really tell you right there, but during this short interview you’re actually being tested on your linguistic skills (whether you opt to have a conversation in English or French is up to you). The interviewer may ask you generic questions about your life, why you moved here, where you work, and so on. They should not ask you knowledge based questions at this point. This step is primarily done to figure out if your English or French is good enough for you to to become a Canadian citizen.

If your English (or French, if you chose French) is considered to be poor, you won’t be taking the written knowledge test. Instead, you’ll be scheduled to meet with a judge who will ask you knowledge questions and then make a final decision regarding whether your linguistic skills are good enough for you to be granted citizenship.

If your English (or French) is poor to the point of not being able to communicate with at least a certain degree of ease, the immigration official is, in theory, allowed to fail you as though you had failed the knowledge test (more on this topic in a moment). I don’t believe this happens very often though, as they are very understanding of linguistic challenges, but you should be able to communicate in one of the two official languages in order to obtain your Canadian citizenship.

Once this registration/linguistic test is over, you’re asked to take a seat in the waiting room. After everyone (in the room with you) has registered, you’ll be invited into a different room where the actual knowledge test will take place.

The Citizenship Knowledge test

The knowledge test is aimed at verifying your understanding of:

  • The rights and responsibilities of Canadian citizens
  • Canadian knowledge (history, geography, culture, political system, etc)

All the information you need to know in order to pass the test is contained within the Discover Canada guide, which is available for free in print, online, as an ebook, audiobook, and even in iPhone format. This guide is only 50 page long, but it contains a significant amount of details, names, and dates. Do not wait to open up the guide for the first time the day before the test, as this will most likely not give you enough time to adequately study and go on to pass the test.
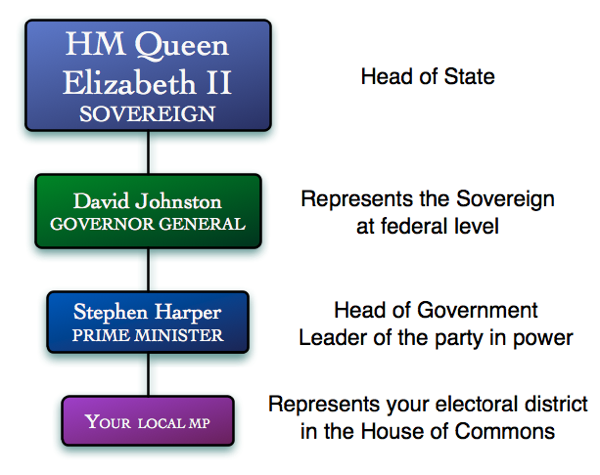
Federal representatives

Key Federal Government Figures

The citizenship knowledge test contains 20 questions, and you are provided with 4 possible answers for each of them. You need to circle the correct answer for all of these questions on the sheet provided. If you get five or less questions wrong, you’ll pass the test. If you get six or more wrong, you’ll fail. Each applicant gets their own completely randomly generated set of 20 questions, so there’s no way to base your own test questions directly off of those someone else may have had.

The fail rate has increased over the last few years. This used to be a trivial test with a mere 5% failure rate. Today however that number has climbed to over 30%. This is to say, you’ll probably pass, but you need to actually study in order to do so. Your average Canadian citizen polled at random on these questions would not pass the test.

You are given 30 minutes to complete the test, which might not seem like that long, but to be honest, it should be plenty of time for most people. I had 19 of the 20 questions answered within two minutes of sitting down. One question’s phrasing was a bit ambiguous so I spent some time thinking about which answer was “more correct” in their view.

I don’t remember all the questions that I was presented with, but there was definitely a mix of both very basic and somewhat harder ones on the test. For example, among the basic questions, they asked me about Canada’s winter and summer sports (hockey and lacrosse, respectively), who the Prime Minister was (Stephen Harper), and who sits at the House of Commons (MPs elected by citizens to represent their electoral district).

As well I remember questions about things such as which are the Atlantic provinces (Newfoundland and Labrador, Nova Scotia, Prince Edward Island, and New Brunswick), and which provinces formed the Confederation in 1867 (Ontario, Quebec, Nova Scotia, and New Brunswick). Topics such as what the highest honor in Canada is (Victoria Cross), who the first Prime Minister (Sir John A. MacDonald) was, and where the majority of Quebec’s population lives (St. Lawrence’s river) were also covered in my sampling of test questions.

I don’t remember the exact questions for the, supposedly more advanced questions, but I believe they delved into such things as when Nunavut became a territory (April 1, 1999), Vimy Ridge, D-Day and Juno Beach, and the names of early Canadian explorers.

Once you are done answering the questions, you leave the room and wait outside. After a little bit someone will come out to inform you regarding whether you passed or failed the test (but no score or feedback on the specific questions will be provided). If you pass, you’ll also receive a notice in the mail inviting you to attend a ceremony where you’ll take the oath and receive your citizenship certificate. In my case this will take place at the end of next month, six or so weeks after the knowledge test, but I’m sure these dates vary a lot depending on your own location.

The whole citizenship test process took about an hour and a half, but this too will depend on the number of people attending the test, how many government employees are working that day, etc.

If you fail the knowledge test, they’ll schedule an interview with a judge on a different date. The judge will ask you to prove your knowledge to see if you’re ready to become a citizen yet or not. If you are, you may receive your citizenship. If you aren’t, I believe you’ll have to reapply for citizenship from scratch (a process that takes at least a year and a half).

Preparing for the Canadian citizenship test

Since the stakes for failing the knowledge test are high, I really recommend that you study the guide in-depth before attempting the test. Personally, I made the mistake of starting to study the guide only a few days before my test. As a result, I had to cram a ton of information into a very short amount of time. Thankfully, I ended up being over-prepared for the test, which I found to be quite easy compared to some of the obscure facts I had learned (from the official guide) in preparation for the citizenship test.

Ideally you’ll want to start studying from the day that you receive the notice onwards. If you do, hopefully you’ll find the test to be easy and will save yourself a lot of last minute stress.

If all you do is read the guide through once, cover to cover, you’ll probably fail the test. Read/study it at least a couple of times and then take as many practice tests as you can. Also, don’t forget to look up information about key government figures in your own province or territory. I personally made sure I knew even the names of the leaders of the opposition parties at both the federal and provincial level (I knew the federal ones already, having a keen interest in politics, but I had to look up and memorize the local ones for British Columbia, the province where I now live.)
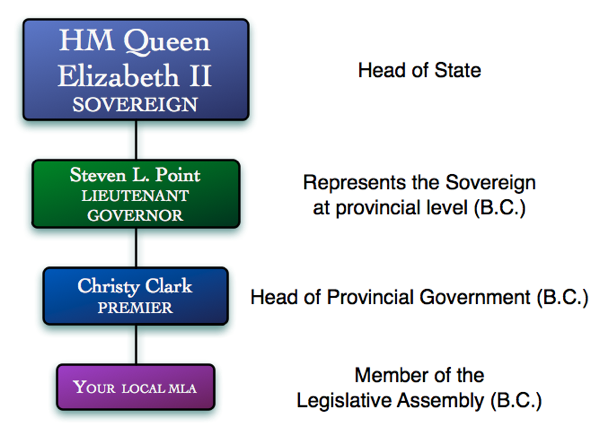
Provincial representatives for B.C.

Key B.C. Provincial Government Figures

I have found the following citizenship practice tests to be beneficial. 90% of the questions on my actual citizenship test were not new to me, as I had encountered very similar ones before through these practice tests.

  • Canadian Citizenship Test iPhone/iPad app by Jonathan Lum
  • Citizenship Flash Cards iPhone/iPad app by Tip Top Good Studio
  • Practice Tests by V-Soul
  • Practice Tests by Richmond Public Library
  • Workbook Canada Citizenship Test

Keep in mind that some of the answers for things that change may be slightly outdated on these tests (e.g., who the leader of the Opposition Party is), but generally speaking they do a terrific job at helping you prepare.

I truly believe that if you can pass the practice tests with ease, you won’t have a problem with the real one, as many of the sample questions are extremely close to the real deal.

Should you face a question for which you truly don’t know the answer, you can start by excluding the answers that you feel are obviously wrong. Usually you’ll instinctively feel that 2 out the 4 possible answers are wrong. If you can narrow it down to two choices, you have a 50% chance of picking the right one.

Many non-profit organizations provide free classes to help you prepare for the test as well. I went to the South Okanagan Immigrant and Community Service center for the first time a couple of days before my test, so there was no time for me to take an actual course. However I did get to have a volunteer test me on my knowledge (by asking me sample questions).

Similar organizations exist all across the country and if you contact your nearest one as soon as you receive your notice to appear (or sooner, if you want to get a lot of prep work in), you’ll be able to attend classes on the material you need to learn and will feel less like you’re on your own throughout the study process. (A list of local organizations of this kind are provided on the pinky-orange colored sheet of paper you should receive with your notice to appear.)

In conclusion, if you prepare for the test, you stand a good chance of coming out just fine. Best of luck to you, soon to be, fellow Canadian citizen.

Filed Under: Canada Tagged With: Canada, canadian citizenship, citizenship, test

Comparing Six of the Best Penticton Gyms

May 5, 2012 By Antonio Cangiano 8 Comments

Update (Jun 21, 2012): For the past three weeks I’ve been going to Riverside Fitness and I’m very happy with it so far.

Update (Aug 8, 2013): Some of the details contained within this review are now outdated. For example, Riverside is no longer offering a $60 month-to-month plan. You either sign up for a full year or opt for an expensive month-to-month plan (I believe $95/month at the time of writing). Nevertheless, reading this post will still give you plenty of general information about the gyms at hand. For the record, I now lift at The Gym.


Despite being a small city, Penticton has a variety of gyms to choose from. As I want to find one for myself, I decided to do a bit of footwork and go visit six such facilities, asking for a tour and information about membership at each.

In this article I share my first impressions of each of these gyms, as I hope these thoughts will help others in the same spot and perhaps lead you to find the best gym in Penticton.

In the order that I visited them, the gyms that I considered were:

  1. Riverside Fitness & Health
  2. The Gym
  3. City Centre Health & Fitness
  4. Penticton Racquet & Fitness Club
  5. Lakeside Fitness
  6. Penticton Community Centre

Riverside Fitness & Health Pros

  • The facility is very new and clean.
  • Free parking is available immediately next to the entrance. (The irony of including parking distance in a review about gyms doesn’t escape me.)
  • This gym is the only truly 24 hour facility in town, once you’ve purchased a key fob (for a one time payment of $49.99). With that key you can let yourself in at any time of the day or night, 365 days a year (holidays included). This aspect is very appealing to me, and I’m sure it is to others as well.
  • The receptionist, Katy, is friendly and professional. Of all the facilities I’ve visited, she was the only person who offered a tour voluntarily. They took my name and a few details, and then offered me a couple of free sessions in exchange for my feedback in an email survey. From a marketing standpoint they were the most proactive in trying to get my business, yet were not obnoxious or overly pushy at any time.
  • Riverside Fitness & Health is very quiet and doesn’t appear to be too busy. According to Katy, “There are at most 8 people here at any one time”. When I was there, preciseley 3 people were working out.
  • The facility does not include any stairs (having arthritis in both of my legs, stairs are not the kind of exercise I need).
  • A few classes are included in the basic membership, allowing you to take one class of your choice per day. These are Yoga, Spinning, Bosu, and TRX Body Blasts. Additional classes are available for those who’ve opted for more expensive memberships or for an additional fee in the case of specialty classes such as crossfit. In particular, they have an excellent Pilates studio/room, however availing of which requires their most expensive (over $200 a month) membership.
  • Free towel service. Got to like that.
  • Affordable: $60/month pay as you go, or $49/month on a 12 month contract. (Yearly gym membership contracts are rarely a good idea, unless you really get into working out frequently after a few months of paying as you go.)

Riverside Fitness & Health Cons

  • The facility is pretty small compared to some of the other gyms in town. Although not busy, there are just two treadmills, two ellipticals, etc.
  • There isn’t a circuit available, such as the Nautilus system.
  • No pool.
  • Basic Plus membership ,which includes all standard classes (so no specialty classes, for which you need to pay individually), is a bit expensive at $120/month pay as you go, or $99/month on a 12 month contract.

The Gym Pros

  • A very nice, clean facility that’s centrally located.
  • Free underground parking (hard to find above ground parking during most daytime hours otherwise).
  • It’s a 24 hour facility, sort of. It’s continuously open from 5am on Monday until 8pm on Friday. Then it’s open from 8am to 6pm on Saturday, and 8am to 5pm on Sunday. On holidays they are open from 8am to 12pm. So essentially, you won’t be able to work out between 8pm on Friday and 8am on Saturday, from 6pm on Saturday until 8am on Sunday, and from 5pm on Sunday until 5am on Monday. If you are a weekend night owl, this may not work for you, but otherwise it’s close enough to being 24 hours.
  • The Gym is fairly large with a variety of up-to-date equipment in the weight and cardio department, including a Nautilus circuit for quick, safe resistance workouts.
  • Tanning and child minding services are available for an additional fee, unless you get their gold membership ($300 for 3 months or $91.74/mo on a yearly plan; there’s no monthly plan offered at the gold membership level), in which case they’re included. I personally have no need for either, but they’re worth mentioning as an advantage of this Penticton gym over some of the others. The gold membership also includes classes and two free shakes per month.
  • Ionized air to reduce the spread of microbial contamination.
  • They have a bar with healthy choices, should you need to recharge after your workout.
  • It looks like The Gym is the place to be if you’re serious about bodybuilding, judging by the clientele.
  • An Infrared sauna is available for free on premise.
  • There’s a ladies only section of the weight room.
  • Affordable: $60/month pay as you go, or $50/month on a 12 month contract. A three year contract drops the membership fee down as low as $42.67 per month.
The Gym in Penticton
The Gym Cons
  • The Gym has a strong “Bro” culture. Think, “You gotta work on your quads, bro. Here have a protein shake, bro” level of broness. The crowd frequenting the facility seems to be young and testosterone laden, including shirtless Hulk-like individuals. This in turn makes the place much more intimidating for regular folks, when compared to any other gym in town.
  • Classes are not included in the basic membership and they cost a lot (from $45 and up a month) if you don’t opt for the gold membership (which is expensive in and of itself).
  • This place is probably the busiest gym in Penticton. Thankfully they have lots of equipment available so this shouldn’t be a massive problem.
  • Free clean towel service is not included in monthly pay as you go memberships.
  • They don’t have a swimming pool.

City Centre Health & Fitness Pros

  • Less flashy than the previous two gyms, but still a large facility located on the third floor of a downtown building.
  • Decent hours (5am – 10pm Monday to Thursday, 5am – 9pm on Friday, and 8am to 6pm on the weekend.)
  • Free towel and locker key service.
  • Free weekly yoga class on Friday.
  • In summer, spinning classes are held on top of the roof.
  • Quite a few classes are available for an extra fee.
  • Good mix of people attending the facility.
  • Not overly busy with plenty of cardio and weight equipment (which is pretty advanced and new). A circuit is available as well.
  • Cheap: $50/month for pay as you go, or $40/month on a yearly contract.

City Centre Health & Fitness Cons

  • Unless you buy a membership that’s three months or longer, you don’t receive free parking on the pay as you go plan. This means that you are faced with the challenge of parking downtown. The options are parking a couple of streets away (on Winnipeg Street) or sticking to the free parking that’s available on Main Street, in which case you need to be in and out in less than an hour. Not cool.
  • Classes are not included in the membership.
  • They also don’t have a pool.

Penticton Racquet & Fitness Club Pros

  • A very large facility with more than just cardio and weight rooms. It includes squash and racquetball courts, as well as a few special amenities like the possibility of booking a massage therapist on site.
  • Free parking right next to the entrance.
  • Decent opening hours (6am – 9pm Monday to Friday, 8am – 6pm Saturday, 8am to 4pm Sunday.)
  • Quiet and idle.
  • There’s a ladies only room.
  • Affordable: $60/month pay as you go, or $50 on a yearly plan.

Penticton Racquet & Fitness Club Cons

  • Clientele mostly comprised of old men, if that matters to you. 🙂
  • There are a few stairs to get to the weight room.
  • Use of both court and equipment requires an all-inclusive membership for $80/month (or $65 on a year contract).
  • Despite the presence of quite a few machines, both the cardio and weight rooms combined were not as big as one would expect in such a large facility.
  • Classes are not included in the membership.
  • They don’t have a pool.

Lakeside Fitness Pros

  • Decent sized facility which includes a small, but adequate sized, pool and whirlpool.
  • Large class/activities area.
  • Nautilus circuit available.
  • Free parking with membership (but only on the second and third floor of the parking structure, otherwise it’s pay by the hour).
  • Decent opening hours (6am – 9pm Monday to Friday, 8am – 6pm on the weekend.)
  • Child minding available.
  • Quiet and idle.
  • They offer a complementary orientation or personal training session to get you familiar with the facility and equipment.
  • Cheap: $50/month pay as you go, or $30/month if paying for a full year in advance. The price includes use of the pool and whirlpool as well.

Lakeside Fitness Cons

  • Much less flashy or new looking than the other places in town.
  • For some reason it’s also darker than other gyms in Penticton.
  • There are some stairs to get to the weight room.
  • Located next to the Casino, so it’s in a pretty busy area (including a busy parking lot).
  • Cardio equipment is available in 10 minute bursts, for which you need to put your name down for a given machine on a schedule that’s available on the wall (which limits you to 40 minutes maximum per machine).
  • Classes are not included in membership and are relatively expensive ($55/month).

Penticton Community Center Pros

  • Stunning pool and whirlpool facility. The pool is huge and includes 10 lanes, plus there’s a lifeguard on duty at all times. It’s the best facility in Penticton from this standpoint.
  • Plenty of parking available near the entrance.
  • The weight and cardio room all has the essentials you’ll likely need.
  • Large changing rooms.
  • Decent hours (between 6am – 8pm weekdays on the summer, 8:30am – 4pm on the weekend.)
  • Affordable: $54/month with pay as you go, or $379 (the equivalent of $31.58/month) if you opt for a yearly membership.

Penticton Community Centre Cons

  • Tons of children running around in the pool area. It’s not exactly a calm, quiet environment.
  • There are a number of concrete stairs in order to get to the weight and cardio room.
  • Less furnished than other Penticton gyms. In particular, I didn’t see a circuit or a huge number of machines.
  • Showers are completely open in the men’s changing room, which means you really don’t get much in the way of privacy.
  • Pool not included in the standard membership. Pool and Fitness (combined) rates are $89/month, or $629 if paying for a full year in advance.
  • The whole facility smells like chlorine everywhere (not just in/around the pool).
  • As is often the case with community centers, they tend to attract a, how shall we say, diverse clientele. As I was touring the facility I was approached by a well-meaning but completely crazy in the coconut man who asked me if I was a bodybuilding instructor. Trust me, I look nothing like one. He then engaged me in a very weird and very creepy conversation, from which I bailed out as politely as I could. Of course, you can meet a guy like that anywhere, but I think you’re less likely to face that problem in gyms that are not operated by the city.

At the end of the day, I feel it’s remarkable that there are so many gym options in such a small city. Which of these is the best gym in Penticton? Hard to say. It really depends on what you want and need.

To me, the possibility of going to the gym anytime I want is really important. During the day I’m very busy, so I can really see myself randomly showing up to work out at 4am sometimes. This would pretty much limit the field to the first two options, Riverside Fitness & Health and The Gym.

At the time of writing I haven’t decided yet between these two. The good news is that with no yearly commitment, I can always try one and switch to a different gym the following month, if I’m not happy with my first choice. I’ll post an update here regarding which one I opt for within the near future.

Filed Under: Canada, Health Tagged With: fitness, gym, health, okanagan, penticton

I’m moving to Penticton, British Columbia

January 27, 2012 By Antonio Cangiano 5 Comments

This year is shaping up to be one of radical change. Some of you may know how I finally decided to take control of my weight, and that I’ve been working on it for a month now.

An arguably far greater change is on the horizon though. In less than a month I will be relocating to Penticton, B.C., at least for the foreseeable future.

My wife’s series of aggravating medical problems have chiefly motivated this move.  In fact, Penticton happens to be my wife’s hometown, where her family still lives.

Penticton

(Image by jconybeer)

With a population of less than 50,000 people, my new city may be many times smaller than Toronto, but the whole area (known as the Okanagan) is a gorgeous, highly popular resort destination chosen by many as their “place to stay forever” (Penticton’s tagline).

It’s where I got married, and I have many fond memories of those days spent surrounded by nature in one of the most Canadian environments I can think of.

I’ll keep you posted and if you are in the area, feel free to drop me a line.

Filed Under: Canada Tagged With: bc, Canada, life, penticton

How to Get Your G1 Ontario Driver’s License

March 22, 2011 By Antonio Cangiano 209 Comments

Three days ago I took the G1 knowledge test, which I happened to pass with a perfect score. Having just gone through the experience of getting my first Canadian driver’s license, I’d like to take a moment to describe the experience for those who are looking to hear about the process of getting a G1 driver’s license in Ontario. Personally I couldn’t find much on this topic when I searched for it before taking the test, which adds to why I want to recount my experience online.

In Ontario there is a graduated licence system that one must follow in order to obtain their driver’s license. After you’ve passed a vision test and a knowledge test, you obtain your G1 driver license (which is the first of step in the rather lengthy process to achieving your G license).

Obtaining your G1 is definitely cool, however it means that in order for you to actually get behind the wheel of a car, you need to have a fully licensed driver – with at least 4 years of driving experience – with you at all times. After holding a G1 license for 12 months (eight months if you take – and pass – an accredited driving course), you’ll be eligible to take a road test and get a G2 license. The G2 has some restrictions, but it enables you to drive on your own. After an additional 12 months, you’ll be eligible to take a more challenging road test, which if you pass, means that at long last, you’ll graduate to a full G license.

Preparing for the test

As a busy professional, I didn’t have much time to prepare for the written test. I needed to learn all the concepts for the test in just three evenings (Wednesday, Thursday, and Friday, as I took the test on Saturday morning). In total I spent about 12 hours preparing for the test (4 hours per night).

The first thing I did was to read the official handbook, cover to cover, over the course of the first two nights. I couldn’t find the copy of the book I bought a while back, so I opted to use the free online version instead. Learning the theory from the book, line-by-line, is certainly important but it won’t likely ensure that you actually pass the G1 test. The reason for this is that there are too many arbitrary rules and numbers for you to accurately remember them all without making any mistakes, by simply reading the theory through once.

The key for me was that I spent Friday evening taking practice tests online. I used this free site, and took all the G1 tests they’ve got up there. At first, as you take these online tests, you may make some mistakes, but this is actually a blessing in disguise, as it will help you realize what your strengths and weaknesses are.

In my case, I immediately nailed all the questions that were logical, but did poorer when it came to things that were entirely arbitrary – as such questions about license suspensions rules. So before proceeding further, I read the rules pertaining to this area again, and also thoroughly reviewed the demerit point system. As I worked my way through this information for the second time, I did so with the earnest intent of really memorizing all of those rules and numbers.

Having read through that data a second time, I took the online practice tests once again and pretty much got 100% on all of them (including the lengthy 200 question “marathon” test). I knew at this point that I was ready for the real deal.

I can’t stress enough though, how much you really want to study and practise, because up to 70-80% of people fail their Ontario G1 knowledge test the first time they take it.

Going to the testing center

Believe it or not, I went to the wrong place first. There was an MTO near my house, so naturally I assumed I could take the G1 test there. After waiting in line for 20 minutes, the lady told me that I was at the wrong place. So I had to head over to an actual testing center that was about 20 km away. To save yourself the same kind of hassle and to find the DriveTest examination center nearest you, take advantage of this useful link.

The good news is that you don’t need to book your G1 test ahead of time. You can go anytime the office is open, though they recommend that you show up at least an hour before closing.

As soon as I arrived, I lined up for the help desk, where I was asked what I was there for. I provided my ID, and they asked me if I’d had a driver license before in any other country. After that, I was given a ticket and went to sit down Mr. Bean style as I waited for my turn.

The vision test

After asking you for your ID and having you sign some paperwork, the first thing you’ll do is take a vision test. You are not escorted, as one might expect, into a separate room to take the vision test, instead you stand there in front of the the DriveTest employee, and are instructed to pick up the pair of binoculars that are attached to the desk.

I was a little worried about this test, as I’ve read horror stories about people with good vision being rejected. Thankfully, in reality the test was very simple and straightforward. You’re shown a group of numbers such as “9 3 7 5 3 2” in three different positions, while you keep both of your eyes opened. Your vision would have to be fairly poor in order for you to mess up those numbers, as they’re printed quite big (they’re larger than the font in this post and they appear even closer to your eyes than your computer screen). Finally, a light goes off on the right or the left, a couple of times, and you need to say on which side the light appeared (this step is done to test your peripheral vision).

Don’t stress about the vision test, even if one of your eyes is weaker than the other, you should have no problem thanks to the fact that both of your eyes are tested at the same time (not one by one, as is sometimes the case at an optometrist’s office).

Going to the testing area

So long as you pass the vision test, you’re immediately asked to pay the $125 test fee, which can be paid via debit card, credit card, or cash. Next they take your photo right then and there, for which you can’t smile and need to keep you chin down as you look at the yellow dot below the camera.

Moving on, they stamp the back of your hand (with a little Government of Ontario logo), and you’re sent to the testing area with a yellow piece of paper with your details on it. You’ll deposit that paper into a basket and take a seat while you wait for the actual writing of the test to commence.

Overall the atmosphere at the testing center was friendly and relatively relaxed. The only worrisome point was seeing how many 16 year old kids were being told that they didn’t pass, and their resulting long faces.

The knowledge test

When they call your name, you head over to the desk and they give you a test form and a pencil (with an eraser, which you’re permitted to use). There are two test sheets, each of which contain 20 questions. The first one is about the rules of the road, while the second set of 20 questions is about road signs.

You need to get at least 16 questions right on EACH of them in order to pass the test. If you get 15 right on one, and absolutely nail the second perfectly, you’ll still fail the test nevertheless and will have to take it again another day (and pay an additional $10 to do so).

The “real world” test questions are remarkably similar to those on the online practice tests. In fact, most of them are included on the real test verbatim. If your memory is any good, you’ll run through and answer most of questions in a matter of seconds. In my case, I had all 40 questions answered in about 5 minutes. I found the test to be quite easy after practising online. If you got 100% on the online marathon test, it’s likely you won’t fail the real test because you’ll be presented with virtually the same questions and format.

Keep in mind that sometimes there will be trickier questions. However, with some common sense you should be able to figure them out. For example, one question asked what the number one cause of skids on the road was. The possible answers included over-inflated tire pressure, going too fast (speeding), and ice or snow.

While realistically the majority of skids will happen on ice or snow, particularly in Canada, you have to answer the way they want you to answer. When the weather conditions are good, speed is the number one cause of skids. When there is black ice on the road, too much speed in relation to the road condition is still the actual cause of skids. So, while it may be tempting to go with “ice or snow”, what you really want to select instead is “speed”.

When you’re done answering the questions, you deposit your test in a tray and your pencil in another, and then have a seat again. After five or so minutes, they’ll call you up and tell you whether or not you passed the test. If you passed, they’ll hand you a yellow paper that includes your test score, as well as your temporary G1 license (which is a piece of thick A5 paper). Your actual plastic license will be mailed out and reach you in about two weeks.

Having passed your G1 test, you can now leave the testing center and go celebrate! (The whole experience at the testing center took about 45 minutes for me.)

My next step will be to find an accredited driving school in North York and take (and pass) their course, so that I can take the road test at the end of November an obtain my G2 license.

I hope this firsthand account helps others out there who are preparing for the first time to get their G1 license. Best of luck to all of you!

Filed Under: Canada Tagged With: driver's license, driving, g1, ontario

Primary Sidebar

Categories

  • Announcements
  • Blogging
  • Business
  • Canada
  • Geekdom
  • General
  • Health
  • Money
  • Photography
  • Poetry
  • Productivity
  • Reviews
  • Sites

Archives

Earnings Disclaimer

This blog is a participant in the Amazon Services LLC Associates Program, an affiliate advertising program designed to provide a means for sites to earn advertising fees by advertising and linking to Amazon.com and other country-specific Amazon sites. We also link to other, non-Amazon, programs that provide us with advertising and affiliate revenue. Thank you for your support.

Copyright © 2011 - 2018 Antonio Cangiano. My other sites: Self-Improvement Blog | Programming Blog | Technical Blogging | Any New Books